Saturday, February 11, 2012

A Month of Food Blogging (10 of 28) : Seafood Carbonara


This recipe is very rich, but it's fast and delicious. We usually eat it with a hefty green salad. You can also eliminate the bacon all together (it's only about 40 calories per serving, but perhaps you're watching your saturated fat, or keeping kosher), and substitute olive oil for the bacon fat. If there's no bacon, I like to add some smoked salmon or trout to bring the smoky flavor back in.

Seafood carbonara


Servings: 2
Time: 15 minutes to thaw seafood, 15 minutes to cook
Planning Ahead: None, unless you want to thaw the seafood in advance.
The Funny Stuff: Block parmesan (or good quality pregrated parmesan)
Virtues: Fast, high in omega-3s
Downsides: Lots of fat from cheese and eggs, high cholesterol from the shrimp, lots of carbs.
Calories: 446

Ingredients
4 oz angel hair pasta, dry
2 oz parmesan
2 eggs
1 Tbsp parsley, chopped (optional)
1 slice bacon
4 large scallops
4 large shrimp
3 cloves garlic

reserved pasta water


Directions
If the shrimp and scallops are frozen, then thaw the shrimp and scallops in a ziploc in warm water. While the seafood is thawing, bring 4 cups water to a boil.

While the water is heating, shred the parmesan in the food processor. Crack the eggs over the shredded cheese, add the parmesan, and stir everything thoroughly.


When the water comes to a boil, add the pasta. Set a pasta timer for 12 minutes. Brown bacon over medium heat.


When the bacon is browned, remove it from the skillet, and add the seafood to the bacon fat, turning it every few minutes.


When the scallops are starting to crack, and are no longer translucent, the seafood is done.
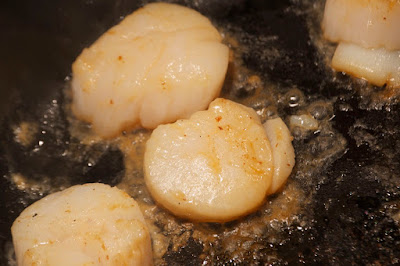

Crush the garlic in with the seafood, and stir. Reduce the heat to medium low.


The pasta should be done at this point. Drain the pasta, reserving about a half cup of pasta liquid. Toss the pasta in the skillet with the seafood. Crumble the bacon over the top, and toss the noodles to coat them in the bacon fat and seafood juices.


Turn off the heat, and immediately, while the pan is still hot, add the egg and cheese mixture on top of the pasta. It needs to be hot enough to cook the egg and cheese, but not so hot that the egg cooks before it coats the pasta. Stir thoroughly.


Once the egg is incorporated, turn the heat on low again. Add the reserved pasta water (which should still be hot) a tablespoon at a time, stirring, until the pasta sauce reaches a creamy consistency.


I like mine moderately creamy, so I added about a quarter cup, but it's entirely a matter of taste.


Enjoy!


Photo credits to Aaron Wood and Aleatha Parker-Wood.

Friday, February 10, 2012

A Month of Food Blogging (9 of 28) : Smoked Paprika Chicken


When I was pregnant, one of our friends gave us a book called Hungry Monkey: A Food-Loving Father's Quest to Raise an Adventurous Eater. The jury is still out as to whether we'll succeed in making our offspring an adventurous eater (the twos are yet to come), but in the mean time, the book was good for a lot of chuckles, and some excellent recipes. This recipe started off as a Hungry Monkey recipe, but as usual, I've added my own spin on it.


Smoked Paprika chicken


Servings: 2-4 (calories listed for 4)
Time: 10 minutes prep, 5 or more hours cooking, optional 20 minute reduction
Planning Ahead: Needs to be started in the morning.
The Funny Stuff: Smoked paprika, canned tomatoes
Virtues: Low fat, lots of vegetables, high in vitamin A.
Downsides: Stains like mad. Wear an apron during the reduction phase.
Calories: 269

Ingredients
4 chicken thighs
1 carrot
1 celery stalk
1/2 onion
2 tsp salt
Pepper to taste
3/4 cup red wine
1/4 cup smoked paprika (no, that is not a typo. 1/4 cup.)
1 can diced tomatoes
1 Tbsp tomato paste (optional)

Directions
Lay the chicken thighs in a single layer over the bottom of your crockpot, and add the chopped vegetables.


Add your salt, paprika and wine, and canned tomatoes.


Give it a good stir to mingle everything, including flipping the chicken a couple of times. Set your crockpot on low, and cook for at least 5 hours.


At this point, you have a very tasty dinner, suitable for a work night.


However, if you're a bit of a perfectionist, or throwing a dinner party, do the following. (While wearing an apron.)

Add the tomato paste to a pan.


Toast it over medium heat, stirring occasionally, until it starts to caramelize.


Strain the sauce through a colander into the pan, leaving the veggies behind.


Turn the heat up to high, and reduce the sauce by at least half, stirring occasionally.


Drizzle it over the chicken and vegetables. (No photo available, we were ravenous by this time.)


Photo credits to Aaron Wood and Aleatha Parker-Wood.

Thursday, February 9, 2012

A Month of Food Blogging (8 of 28) : Asian pulled pork sandwiches


I'm a fiend for variety, so I love this kind of remixing of ingredients. Once reduced, the braising liquid from the chashu becomes a sort of Asian BBQ sauce, and the chashu itself stands in for pulled pork. Toss on some cabbage and green onions, for sort of a cole slaw vibe, and suddenly you're serving southern food with an Asian twist. The hot braising liquid wilts the cabbage a bit, which I like. It's a bit too much crunch, otherwise.


Asian pulled pork sandwiches


Servings: 2
Time: 15 minutes
Planning Ahead: Needs chashu and the leftover braising liquid
The Funny Stuff: No funny stuff
Virtues: Fast, lots of cabbage
Downsides: Refined carbs from buns, fat from pork
Calories: 496

Ingredients
4 oz chashu
Leftover chashu braising liquid
2 sandwich rolls
1 cup shredded cabbage
1 green onion, chopped

Directions
Pour the leftover braising liquid in a pan, and set it over medium high heat. You may also wish to strain it, to remove the peppercorns and ginger, but I always forget, and honestly, I kind of enjoy the little pops of ginger in the final product. The peppercorns are a bit much, though. Someday I will remember to wrap them in cheesecloth during the initial braising.


Finely shred the cabbage with a knife or food processor.


Toast the buns in a lightly buttered skillet. Or under the broiler, or in a toaster oven. We're non-judgmental here.


Once the buns are toasted, lay 2 oz. of thinly sliced pork on each bun, along with 1/2 cup of cabbage, and some green onions.

When the braising liquid has reduced enough that it's starting to form sticky bubbles, and is looking slightly caramelized, remove it from the heat.


While it's still hot, pour it promptly onto the cabbage to wilt it.


Enjoy!

Photo credits to Aaron Wood and Aleatha Parker-Wood.

A Month of Food Blogging (7 of 28) : Smoked fish and citrus salad


This salad is a nice tangy, smoky salad, perfect for the spring-like weather we're having today. I ate it almost constantly when I was pregnant.

Dinner salads are deeply underrated things. For starters, there's often no cook time involved, just chopping time. When there is cooking, it's often something fast. (For instance, skirt steak salad is a popular one at our house, but it takes less than 10 minutes to pan-sear skirt steak.) They're generally quite healthy, especially if you make your own dressing, as I've done here. This is often a meal in itself, but if you're a little bit hungrier, some bread and a bit of soup rounds it out nicely.

I usually don't have smoked salmon in the house (it's expensive, and I never go through it all before it goes bad). However, I find that smoked trout in a can has a lot of the same flavor, and will sit in your cupboard until you need it. It's also handy for bringing a smoky flavor to carbonaras, and tossing over rice bowls.


Smoked fish and citrus salad


Servings: 1
Time: 10 minutes
Planning Ahead: None
The Funny Stuff: Smoked trout or salmon
Virtues: Low carb, lots of veggies, high in vitamin C
Downsides: Not a low calorie salad, due to the olive oil, avocado and feta
Calories: 391

Ingredients
2 cups chopped lettuce
1 oz smoked trout or hot-smoked salmon
1/4 avocado, diced
1 oz feta
1/2 orange, diced
1/4 cup chopped bell pepper
1/2 tbsp orange juice concentrate
1 tbsp olive oil
1/2 tsp white wine vinegar


Directions
Chop the lettuce, bell pepper, and avocado. Chop the top off the orange, and then the sides, to remove the peel.


Slice it thinly, and then into cubes. (Ok, I know you know how to dice an orange, these are just gratuitous orange shots, because they made me salivate.)


Toss the veggies on top of the lettuce, and crumble the fish over.


Toss the dressing ingredients in a bowl, or a sealable container.


Whisk it or shake it until it forms a fine emulsion, such that the oil drops are barely visible.


Crumble the feta over the salad, and drizzle it with dressing.


I served it with warm baguette. The baby was napping, and sadly does not yet eat salad, but she got some avocado chunks after her nap as a snack.


Photo credits to Aleatha Parker-Wood.

Wednesday, February 8, 2012

A Month of Food Blogging (6 of 28) : Caramelized cauliflower


This one is a perennial favorite around our house. The baby adores cauliflower, and even my initially dubious husband thinks this is pretty darned delicious. The caramelization gives it a nice toasty flavor, and destroys that pesky sulfurous smell that brassica is prone to. And the browned butter with curry makes your entire kitchen smell great. (Although if you don't have curry on hand, this is pretty tasty even without.)

Microwaving it bootstraps the cooking process, making this a great last-minute dish. (And by last minute, I mean "oh shoot, the pasta is already done, and I forgot to make a vegetable.")

Caramelized cauliflower


Servings: 2 (4 if you're less greedy about your cauliflower.)
Time: 7 minutes
Planning Ahead: None
The Funny Stuff: Curry powder, garam masala
Virtues: Cauliflower! Vitamin C, potassium, B6, all that jazz.
Downsides: Butter.
Calories: 120

Ingredients
1 small head of cauliflower
olive oil or cooking spray
1 tbsp butter
1/2 tsp mild curry powder
1/2 tsp garam masala
salt

Directions
Chop cauliflower into medium chunks. Try to make sure most chunks have at least one flat surface to caramelize. Pop it in a microwave safe bowl, loosely covered, and microwave it for 4 minutes.


Preheat and oil a skillet on medium-high. When the cauliflower is done microwaving it, toss it in the skillet, and sprinkle with a pinch of salt. Cook until one side is golden brown, and stir.


Remove the cauliflower from the pan, and set aside. Melt the butter in the skillet until it starts to brown very slightly.


Toss in the curry and garam masala, and let them get nice and fragrant.


Drizzle the browned butter over the cauliflower.


We had this with fish and a mediterranean pasta toss: lemon juice, olive oil, feta, sun-dried tomatoes, etc.


And baby had the same, and loved it. (Minus the feta.)


Photo credits to Aaron Wood and Aleatha Parker-Wood.

Tuesday, February 7, 2012

A Month of Food Blogging (5 of 28) : Ramen with Chashu (Lazy food)


One of the ongoing themes of this blog is to choose your battles, both culinarily and otherwise. Not every meal at our house is scratch cooked gourmet food. However, I try to have things on hand that make it easy to eat well, even if I'm just opening a package. A little bit of stockpiled food goes a long way, and adding a little meat and a few veggies can take something from a health hazard to a well-rounded meal.

This dish falls somewhere in the middle between real ramen, and that nasty stuff you used to eat in college. Real ramen is a glorious brothy wonder that takes hours to make. Pork bones are slowly simmered, broth created, noodles made fresh on the spot. I eat mounds of it every winter, but I've never made it, it's too much work. I have a couple ramen-ya in the area that I rotate through, each with their own specialty. Packet ramen, on the other hand, is a tragic pile of sodium and fat, with not a vitamin in sight to redeem it. The high end ramen you can get in Asian markets is closer to the former than the latter. It takes about as long as packet ramen, but has less fat, surprisingly good noodles, and comes with real pork goodness. It requires you to have high quality pre-made ramen on hand, but it's almost as good as going out for ramen, is actually faster than getting takeout, and doesn't require you to bundle up children into the car, or leave work before 10 PM when the ramen shops are open. It's also a great dish to blog about when you've had a long day, and minimal time to cook and shoot.


Ramen with Chashu


Servings: 2
Time: 10 minutes
Planning Ahead: Needs chashu
The Funny Stuff: Real ramen, nori
Virtues: 10 minutes of effort, lots of vitamins from the nori
Downsides: Requires real ramen, reminds you of being a starving student.
Calories: 547

Ingredients
4 oz of chashu, which you have already made
1 2 serving packet of high quality tonkotsu ramen
1 sheet nori
1 green onion, sliced

Directions
Compare your tonkotsu ramen to Maruchan. Notice how it is not insanely fatty, and has a realistic serving size. (2 servings per noodle block? Please.)


Chop some squash and put it in a bowl, so you can tell your mom you ate your vegetables. Pop it in the microwave, loosely covered, for 7 minutes.


Follow directions on ramen packet. Boil, mix broth, put noodles in broth, etc. Slice some chashu and green onions. Place chashu, green onions, and a half sheet of nori on each bowl.


Chop some squash and chashu for baby.


Eat dinner and go to bed.

Photo credits to Aaron Wood and Aleatha Parker-Wood.